29 August 2013

Simple Fried Chicken for Kids

BY Unknown IN , , No comments

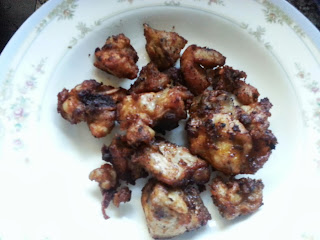
Fried Chicken does not get any simpler than this. The only time consuming part is allowing the chicken to sit in the marinade for a while. Its a great snack for the kids and its something you can prepare before hand and just fry as and when you need it. You can store the marinated chicken in the freezer and just defrost and fry when ready.
Its a great finger food for a high spirited toddler that doesn't have the time to sit down and eat his food :)


Simple Fried Chicken
Ingredients:
2 chicken thighs
3 tablespoons maida
3 tablespoons cornflour
1 tablespoon soy sauce
1 tablespoon tomato sauce
Salt to taste
Pepper to taste

Method:
1. Cut the chicken thighs into small bite size pieces and wash the chicken. Take a large ziplock bag and put the chicken and the rest of the ingredients for the marinade into the bag. Shake well and place the bag in the refrigerator for at least 5-6 hours.
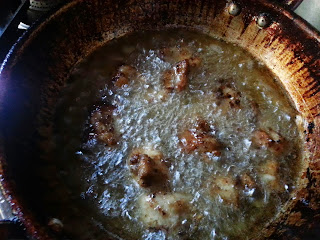
2. Heat oil in a heavy bottomed vessel, once the oil is hot, reduce flame, and fry the chicken on medium flame  for 6-7 mts. Cook on high flame for another 2-3 mts  till golden brown. Drain onto absorbent paper and serve hot.


27 August 2013

MEET BABY LUCAS!

BY Unknown No comments


Meet the new man in my life, Lucas James George, lovingly known as Chackochi.. He's the reason I've been absent from TTC the last few months.. But I'm back now and you can expect some interesting posts very soon :)

04 June 2013

Ghee Roasted Bananas

BY Unknown IN , No comments

This recipe is a life saver when you want a quick snack for your child cos he’s dying of hunger and won’t stop bawling long enough to give you space to even think about what to cook for him!

I vaguely remember my mom making this for us when Kevin & I were kids, but what jogged my memory was that she made this for Kochu quite often when we went to India in January. Kochu was being his usual self and refusing to eat anything but that was mostly because he was too busy enjoying running around and exploring and did not have the time or patience to stop and eat. These taste great served hot or cold. Mom also used to prepare it when we had to go on trips to relative houses and stuff as an in between snack for Kochu.

You need to use ethappazham or nentran pazham for this snack since those are the bananas that work well for this. So try to get ripe ethappazham to make these ghee-roasted bananas.For readers in Christchurch, you'll be able to get these from that little Fiji Indian dairy set up in a container, since the quake, on Colombo street. They are called Triton Dairy, 382 Colombo Street.

The ethappazham just taste simply delicious. I always make some extra for Renju and me as well as they are just irresistible. The riper the bananas the sweeter it will be and so you won’t need to add any sugar. Now onto the recipe. Enjoy!

Ghee Roasted Bananas

Ingredients:

Ethappazham/nenthrapazham, 2
Ghee, 4-5 tbsp
Sugar, to sprinkle (optional)

Method:
1.Cut the bananas into little circles. The pieces should be 1/2" thick.

2. Pour ghee into a pan and when it warms up, add the banana pieces. Fry until golden brown.


3. Sprinkle sugar generously when the banana pieces are still warm, i f needed. I left out the sugar as these were sweet enough without the sugar and simply melt in your mouth!


They are quite crispy when warm and soft and spongy when cold. YUM YUM! Even Kochu approves :)


29 May 2013

Chicken Noodle Soup

BY Unknown IN , , , No comments

Chicken soup… aaahhh blissfully simple, warming, healthy, filling & utterly delicious.

I made it for Kochu when he came down with the flu and refused to eat anything else…

Of course you can make it anytime, especially if you have some leftover chicken and vegetables that you do not want to waste. I got my inspiration for the soup from my friend’s blog Manju’s eating delights and her post on Chicken Soup and just adapted a bit to my liking...

This aromatic broth will warm you up on a winter's evening - it contains ginger, which is particularly good for colds too. This is a sure fire recipe to try out this winter and  it is ridiculously low in calories, practically no fat at all; it'll fill you up without any guilt whatsoever. Enjoy J

Chicken Noodle Soup


Ingredients:
2 tablespoons sesame oil
1 big garlic clove, crushed
Celery, chopped
 1 Carrot, diced
1 Potato, diced
2 heaped handfuls of cooked shredded chicken
2.5 cups chicken stock
1 cup boiling water
Piece of ginger about the size of your thumb, thickly sliced
3/4 tbsp fish sauce
Few good splashes of soy sauce
1 big handful of noodles (I used egg noodles but feel free to use whatever you fancy)

Method:
1.       Put a saucepan onto medium heat and add a few splashes of sesame oil, add your garlic until it starts to sizzle. Stir it around a bit & add your celery, carrot and potatoes. Fry until they start to soften.
2.       Toss in your chicken and stir to make sure it gets nicely coated in the oil & garlic. Pour in your stock & boiling water. Add your ginger slices, fish sauce & soy sauce.
3.       Just before it comes to the boil add your noodles.
4.       Season with some Italian seasonings and pepper if required.
5.       It should only need another minute or two before its ready.
6.       Add a few extra  red chilli slices for fire lovers.
7.       Eat your chicken & noodles first, then pick up the bowl & slurp the soup that's left behind.


30 April 2013

Banana Pancakes - Whole Wheat & Sugar Free

BY Unknown IN , , , , , , No comments


I love this banana pancake recipe – its quick, easy and healthy!


These pancakes are completely delicious and the wonderful thing is that they are completely sugar free and provide the goodness of whole grains.

They also freeze very well, so you can make up a big stack at the weekend, pop a square of waxed paper in between each one and store them in the freezer, to be used individually as needed – the waxed paper, of course, stops them sticking together. It’s the perfect solution to providing a healthy breakfast on a busy morning.

Banana Pancakes
Ingredients:
1 cup whole wheat flour
1 cup milk
1 tbsp melted butter
1 egg
1  very ripe banana
1 tsp vanilla essence (optional)

Method:
1. Beat the egg in a small jug and stir in the milk.
2. Place the flour in a bowl.
3. Using a fork, incorporate the milk mixture – a little at a time – into the flour, until you have a smooth batter.
4. Stir in the mashed banana, vanilla essence and the butter (if you want to add any extras, such as a little chopped apple or blueberries, do so at this point).
5. Grease a frying pan, heat and spoon the mixture into the pan to create individual pancakes.


6. Cook for around 2 mins, then check underneath – as soon as they are golden, turn them over carefully and cook for a couple of minutes more.


Cool to a safe finger food temperature and serve!

23 April 2013

Mushroom Pulao

BY Unknown IN , , , , , , , , , No comments


I admit it. I am lousy at being pregnant. While other moms are being complimented on their healthy glow, I spend the first trimester of my pregnancy looking puffy, bloated, and blotchy. I may not be able to hold down anything more than cheese crackers, but I still somehow manage to put on an extra 75 pounds over the course of 40 weeks. I can't take a flight of steps without sitting to rest midway up or down, and my feet swell up so much they look like Barney’s paws!

As if all this weren't enough, I awoke one morning to find that I was unable to stand up without help, sit in a chair, or walk without excruciating pain. I contacted my midwife to learn that I was suffering from a rather common condition known as pregnancy-related sciatica or, what I would call, "major pain in the rear!"

What is sciatica, I asked Google and according to Google - Women with sciatica often experience shooting pains or paralyzing numbness in the lower back or buttocks area and sometimes down the backs of the thighs. The pain can be severe enough to limit a person's mobility almost entirely, and because it is caused by the position of the baby inside the womb, there's very little that can be done to relieve the situation entirely until the baby is born… blah...blah… blah. And lucky for me Google also had a few exercises I could do to reduce the stress on my sciatica nerve this reducing the pain I was in... Thank God for  the Internet!

So with all of this excitement(not!!) going on and not to mention feeling dead tired all the time, I have been trying my very best to still find the energy to cook interesting/tasty foods for Kochu. I absolutely love mushrooms, so does my Dad and I've been trying to get Kochu to enjoy them as much as we do… And so far so good J

Pilaf, Pulav, Pulao. They are all the same.

It is a pretty simple recipe and I got it from Vazhyila.com… You should check out that blog. She has some wonderful South-Indian recipes and we can of-course always adjust the recipe to suit our little person’s taste buds.  

A simple one pot meal, this pulao our favourite for a quick dinner which definitely does not lack in colour or flavour. Together with some cool Cucumber Raita and Pappadom, its almost vegetarian biryani heaven.

Kochu finds this to be yummy enough on its own, but me being me, I usually add in a boiled egg for some added protein for him. I promise you, you’re bubs won’t be disappointed.


Mushroom Pulao
Adapted from vazhayila.com

Ingredients:
Basmati Rice - 2 cup
Mushroom - 250 gm
Onion chopped - 2
Ginger and garlic crushed - 2 1/2 tsp'
Yogurt - 4 tsp
Turmeric powder - 1/4 tsp
Garam masala - 1/2 tsp (optional)
Water - 4 cups
Cardamom pods - 3
Cloves - 4
Cinnamon stick - 1
Bay leaves - 1

Method:
1. Soak the basmati rice for 15 minutes and drain.
2. Heat butter or oil in a cooking vessel, and add whole cardamom, cloves, cinnamon stick and bay leaves.
3. Toss it for 30 seconds and add chopped onions. Sauté till the onions are soft and pink.
4. Add crushed ginger and garlic and stir fry till their raw smell disappears.
5. Stir in the chopped mushrooms and sauté for 4-5 minutes (dice it into chunks since it gets small while sauteing.)
6. Add turmeric powder and garam masala and 4 tsp yogurt and mix it well.
7. Add the soaked rice and fry it for a minute or two.
8. Add 4 cups of water and cook it covered on medium flame until the rice is cooked and the water is absorbed. Switch off the flame and let it stand covered for 10 minutes before serving.

09 April 2013

Minced Meat Macaroni

BY Unknown No comments


I know you were starting to think my blog was pure vegetarian, but it’s not. It’s just that vegetables are so much more versatile than meat and they are so much easier to experiment with than meat. So to break that veggie cycle I seem to have going on, today's recipe’s main ingredient is Minced Meat (beef).

This is an Indian/Keralite take on our western world bolognese recipe. It’s definitely worth a try and its one of those recipes where everyone in the family can enjoy rather than it being just for the kids.  You can adjust the spice according to your bubs taste.

This is the only way I get some red meat into my little man these days. Do try it, I’m sure you're kids will love you for it. :)

Minced Meat Pasta


Ingredients
  • 1 tablespoon olive oil
  • 1 onion, finely diced
  • 2 cloves garlic, crushed
  • ½ teaspoon kashmiri chilli powder
  • I - 2 teaspoons coriander powder
  • ¼ teaspoon turmeric powder
  • 500g lean beef mince
  • 1 medium carrot, grated
  • 1 medium zucchini, grated
  • 2 tablespoons tomato paste
  • 400g can chopped tomatoes
  • ½ cup water
  • 2 - 3 tablespoons cream cheese (optional)
  • 375g macaroni
  • Pinch of Italian herbs
  • Grated Parmesan, to serve (optional)
Method
1. Heat the oil in a large saucepan over medium heat.
2. Add the onion and garlic and cook, stirring, until onion is soft.
3. Add in the chilli, coriander and turmeric powders and saute until the raw smell disappears.
4. Add the beef and stir until brown, breaking up any large lumps.
5. Add the carrot, zucchini and tomato paste and stir for 5 minutes.
6. Stir in the tomatoes, water and cream cheese and simmer covered for 40 minutes, stirring occasionally.
7. Cook the macaroni according to the instructions on the packet. Drain mix with minced meat sauce. Garnish with Italian herbs and parmesan cheese, if liked.

 Note:
This minced meat sauce is very versatile. Serve with spaghetti, spoon over potatoes or even just add in some red kidney beans for a tasty side for rice or chapatti.

03 April 2013

Raagi Porridge/ Finger-Millet Porridge

BY Unknown No comments


What do you give your growing child?

Is it just me or are there other moms out there that like me struggle to get breakfast into your kid every morning before rushing him off to day-care? Kochu loves to sleep in and never wakes up until its only 20 minutes left for us to rush out of door so we don’t get stuck in the morning traffic. So of late, breakfast is pretty much out of the question on weekdays.

Since this was a trend I started noticing in him while we were on holiday in India too, I tried to be smart and planned ahead. I came back from my holiday loaded with bottles of Horlicks and Complan Kesar Badam. Most of us have grown up drinking milk with one or the other of these beverage mixes and we have our favorites in continuing that tradition of a nutritious drink for our own children. Right? So that’s his morning and evening drinks sorted on the weekdays. But come weekend and I’m ready to fill him with delicious yet healthy food that would (hopefully) compensate for not eating brekkie 4 days a week.

And for this my power ingredient has been Raagi.

Ever since Kochu has been on solids, my mom has been going on and on about how healthy Raagi is and how good it is for kids and how I should be giving it to Kochu at least once a week. I did give Kochu loads of it while he was a baby and on soft solids but stopped when he started eating other foods. So this time Raagi made it onto my shopping list and I must say I’m glad it did.

It is quite easy to make and is surprisingly tasty too! Raagi is readily available to buy in medical stores in India but if you have the time and patience I would recommend preparing the Raagi powder traditionally at home for babies. Ideally, Raagi grains are washed, soaked, sprouted, dried and milled to fine flour, but since we did not have the time or patience to do this when we were home this time I had to settle for the store bought version.

Coincidentally Raagi is quite good for adults and kids alike so this has been my breakfast on weekends too and I must say I’d take a bowl of Raagi malt instead of Oats or any other cereal any day!.

This recipe is quite forgiving and you can adjust it according to your taste. This is how I’d prepare it for my son. Feel free to replace whole milk with the milk of your choice.

You’ll have to forgive me for the picture, but I was playing with the different modes on my phone and experimenting with it and so I didn't end up with the best picture. But I’ll take a better picture the next time I make this and post an update, but for now this will have to do. And of course here's a picture of my cheeky little monkey having his breakfast (on his own, I might add!)


So without further ado let’s get onto the recipe J

Raagi Porridge/ Finger-Millet Porridge

Ingredients
Whole Milk – 2 cups
Raagi Flour – 2 heaped tablespoons
Almond Meal – 2 tablespoons (optional)
Sugar – 1 tablespoon
Cardamom– 2 pods
Ghee – few drops (optional)

Method
  • In sauce pan boil 1.5 cups milk.
  • Meanwhile, in a small cup mix the Raagi flour and almond meal with the rest of the milk making sure there are no lumps. Add this to the boiling milk and let it cook for 5-6 minutes until nice and thick.
  • Pry open the cardamom seeds from the pods. In a mortar and pestle, grind the cardamom seeds to a fine powder.
  • When the milk comes to a boil, reduce heat to low and stir in the Raagi & almond milk and continue stirring intermittently to see that no lumps are formed, until cooked or about 5 mins. If you see any lumps, just smash them with the back of a spoon to dissolve.
  • Turn off the heat, stir in sugar, ghee and the ground cardamom and mix well.
  • Serve hot or warm

Notes
 It is important that you mix the raagi flour with milk before adding it to the boiling milk else lumps will form.
Feel free to substitute sugar with jagerry or brown sugar or even honey.

11 March 2013

Sweet French Toast with Summer Berries

BY Unknown No comments


mmm Ahem… Hi… I’m back J

Ya, ya I know I did it again… Quite cheeky of me actually since my last post was an exceptionally long post about how I’d be better this year and that I’d stop this disappearing act and all that… But you have to forgive me, just this one last time. Why? Well, let me explain.

2013 so far has been..umm.. How do I put it? Interesting?? In the last 2.5 months I've had the scare of a lifetime and I've also been the happiest. We had a lovely holiday planned in January. We were going back home for my brother-in-law’s wedding. Two days before we were due to travel, I got news my Dad had suffered a stroke. Being the Daddy’s girl that I am, I did not take the news well. But thanks to God, he is slowly recovering and is now almost back to his old self. And in addition Renju’s grandmother, God bless her soul, passed away while we were in Kerala as well. But we were glad we were there and were able to attend the funeral otherwise I knew R would have felt very bad.

And in between all of this I have a bun cooking in the oven again, if you know what I mean!!! JJJ 

You can now  imagine how blogging took last priority on my list since the year began. But I’m back now, fully rested and full of energy to get back into it again.

So to declare truce, my first post of the year is something so sweet and so simple and uncomplicated that its guaranteed to be liked by your kids and even adults, especially if you're like me! You just can't go wrong with French toast, so enjoy...

Sweet French Toast with Summer Berries


Ingredients
  • 2 eggs
  • 1 cup milk
  • ¼ teaspoon cinnamon
  • ½ teaspoon vanilla essence
  • 1 tablespoon sugar
  • 1-2 tablespoons vegetable oil or butter
  • 4 slices toast bread
  • Summer berries
Method
1. Beat the eggs, milk, cinnamon, vanilla and sugar together in a bowl until well blended.
2. Heat the oil or butter a non stick frying pan until it is hot but not smoking.
3. Dip slices of bread quickly into the egg mixture, coating both sides being careful not to soak the bread.
4. Fry the coated bread on both sides for 2-3 minutes on each side or until golden brown.
5. Top with summer berries and serve immediately.